Weekly Craft Classes For Kids
Focused on Developing Must-Have Skills For The Future
Creativity, delivered to your doorstep!
Monthly arts & crafts kits for curious kids
Weekly Online Craft Classes For Kids
Focused on Developing Must-have Skills For The Future
Arts & Crafts Experiences for Kids
Create and connect through our in-person classes, parties, events, and DIY kits!
Arts & Crafts Experiences for Adults
Create and connect through our in-person classes, parties, events, and DIY kits!
Join Canvas Club for a fun and educational experience! We help your child create cool crafts, foster curiosity, and gain confidence. We can't wait to see what your child creates!
At [YourClubName], we're on a mission to inspire creativity through our monthly kits – designed to develop essential skills for the future. We can't wait to see what your child creates!
At [YourClubName], we're on a mission to inspire creativity in children through our engaging online classes – designed to develop essential skills for the future. We can't wait for your child to embark on a journey of creativity with us!
Join [YourClubName] for a fun and educational experience! We help your child create cool crafts, foster curiosity, and gain confidence. We can't wait to see what your child creates!
Join [YourClubName] for a fun and creative experience! Dive into the world of arts and crafts, experiment fearlessly, and build confidence in your artistic abilities. We can't wait to see what you create!
Are you a busy parent concerned that your child might not be tapping into their creative potential?
You’re struggling with:
Worrying that your child isn't being creative enough and needs more exciting things to do
Not knowing what activities to do with your child and what supplies to use
Not having enough time or energy to do creative activities with your child at home
Being scared your child is not learning important problem-solving and critical-thinking skills
Feeling bad when your child spends too much time watching TV or playing with screens
And all you want is to:
Feel confident that your child is being creative on a regular basis
Know your child is creating something new every week while experimenting with different materials
Have someone else teach your child
Have peace of mind knowing that your child is gaining super-skills they'll need for the future
Be proud of the activities they do, with no guilt
If this sounds like you, we've got just what you need!
Are you a busy parent concerned that your child might not be tapping into their creative potential?
You’re struggling with:
Not having enough time or creativity to plan and prepare activities for your child to do at home
Getting tired of trawling the aisles not knowing which supplies to buy
Being scared your child is not learning important problem-solving and critical-thinking skills
Feeling bad when your child spends too much time watching TV or playing with screens
Worrying that your child needs more exciting activities to stimulate their creativity
And all you want is to:
Offer your child carefully curated creative experiences without having to plan and prepare the lessons yourself
Get instant access to good quality supplies that equip your child with the tools they need to be creative
Have peace of mind that your child is getting the guidance they need to develop important skills they'll need for the future
Feel confident that your child gets the opportunity to practice and develop their creativity in a hands-on way
Give your child something exciting to look forward to every month
If this sounds like you, we've got just what you need!
Are you a busy parent concerned that your child might not be tapping into their creative potential?
You’re struggling with:
Worrying that your child isn't being creative enough and needs more exciting things to do
Not knowing what activities to do with your child and what supplies to use
Not having enough time or energy to do creative activities with your child
Being scared your child is not learning important problem-solving and critical-thinking skills
Finding an engaging online program that your child can take part in from home
And all you want is to:
Feel confident that your child is being creative on a regular basis
Know your child is creating something new every week while experimenting with different materials
Have someone else teach your child
Have peace of mind knowing that your child is gaining super-skills they'll need for the future
Save time and money by not having to drive your child to arts & crafts class
If this sounds like you, we've got just what you need!
Are you a busy parent concerned that your child might not be tapping into their creative potential?
You’re struggling with:
Worrying that your child isn't being creative enough and needs more exciting things to do
Not knowing what activities will engage their interest and which supplies are appropriate for their age
Being scared your child is not learning important problem-solving and critical-thinking skills
Feeling bad when your child spends too much time watching TV
Not having enough time or energy to research and actually do creative activities with your child at home
And all you want is to:
Feel confident that your child is being creative and making a new craft every week
Know that your child gets to do engaging and fun activities using a variety of supplies
Have peace of mind knowing that your child is gaining super-skills they'll need for the future
Be proud of the activities they do, with no guilt
Have someone else teach your child each week
If this sounds like you, we've got just what you need!
To all the busy people eager to explore their creative side…
Does this sound like you?
You’re struggling with:
Wanting to be more creative but don’t know how or what supplies to use
Having trouble making new friends who share similar interests
Feeling bad when you spend too much time watching TV
Craving a creative and social get together to break your weekly routine
And all you want is to:
Have someone else show you how and what supplies to use
Make new friends who value the same things you do
Find more wholesome activities and learn new skills that replace passive entertainment
Have something fun and enriching to look forward to every week
If this sounds like you, we've got just what you need!
Introducing:
Cape Town's Leading Kids Craft Club for Ages 2-12.
When you join our club, you can relax knowing your child is in a safe and nurturing environment where they can create educational and fun crafts.
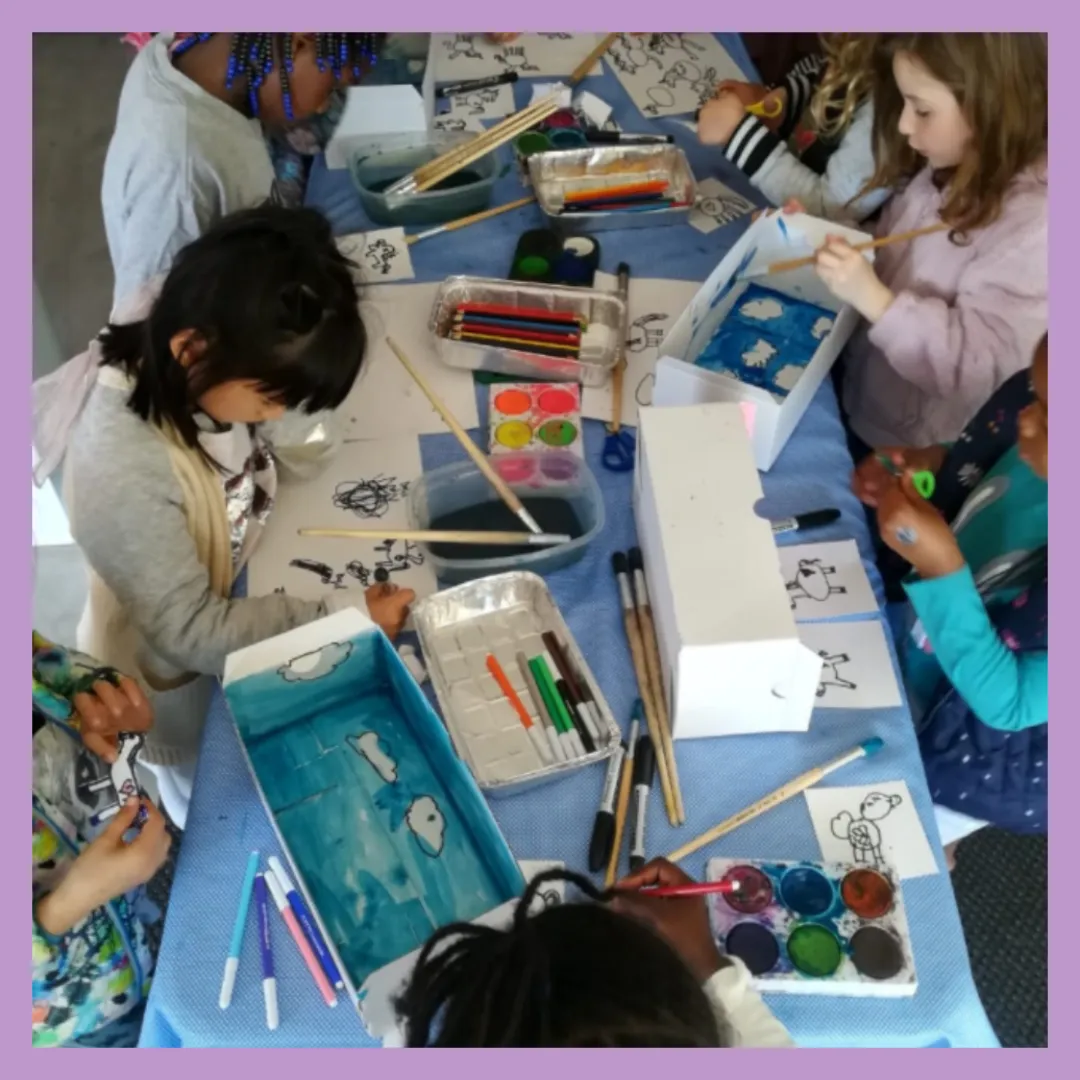
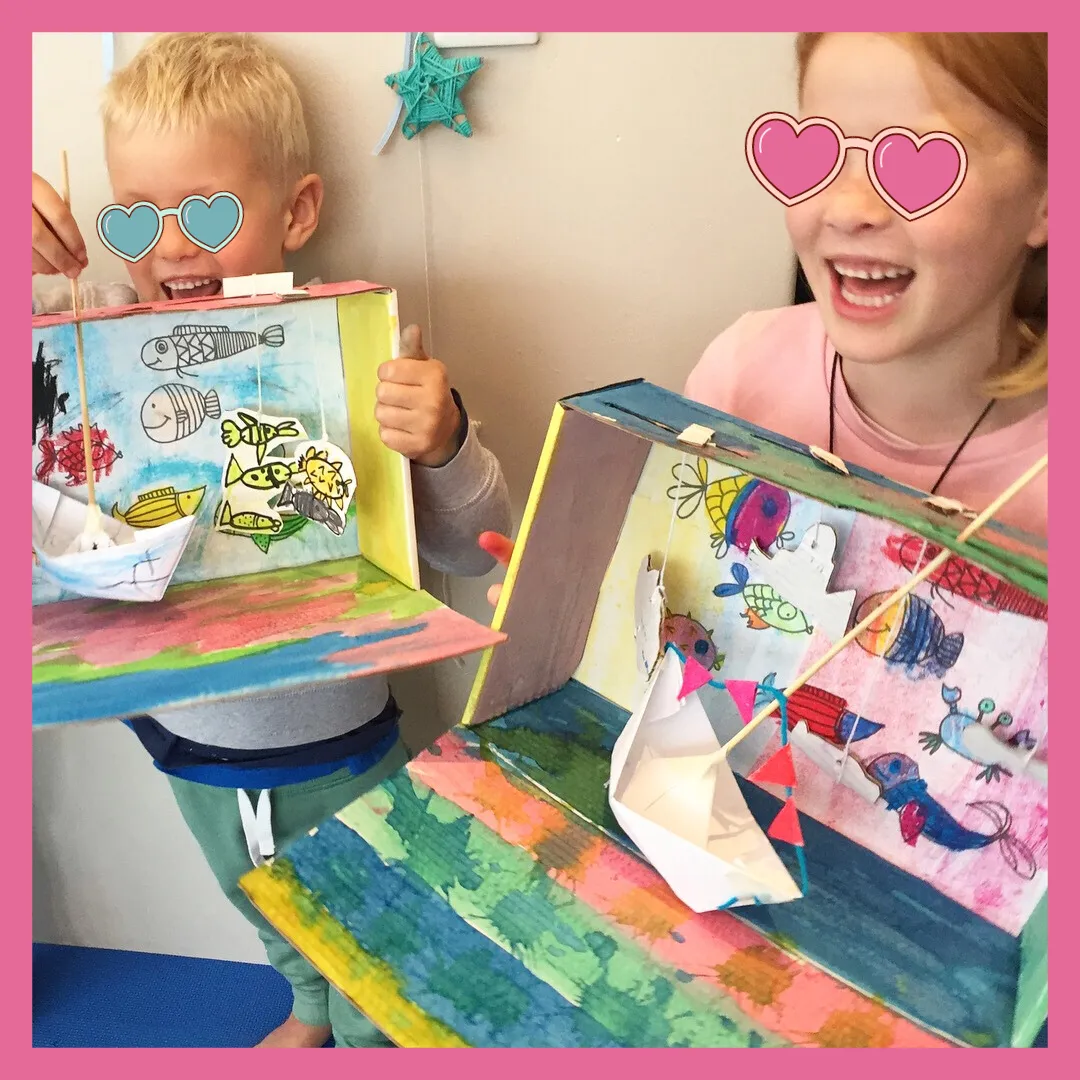
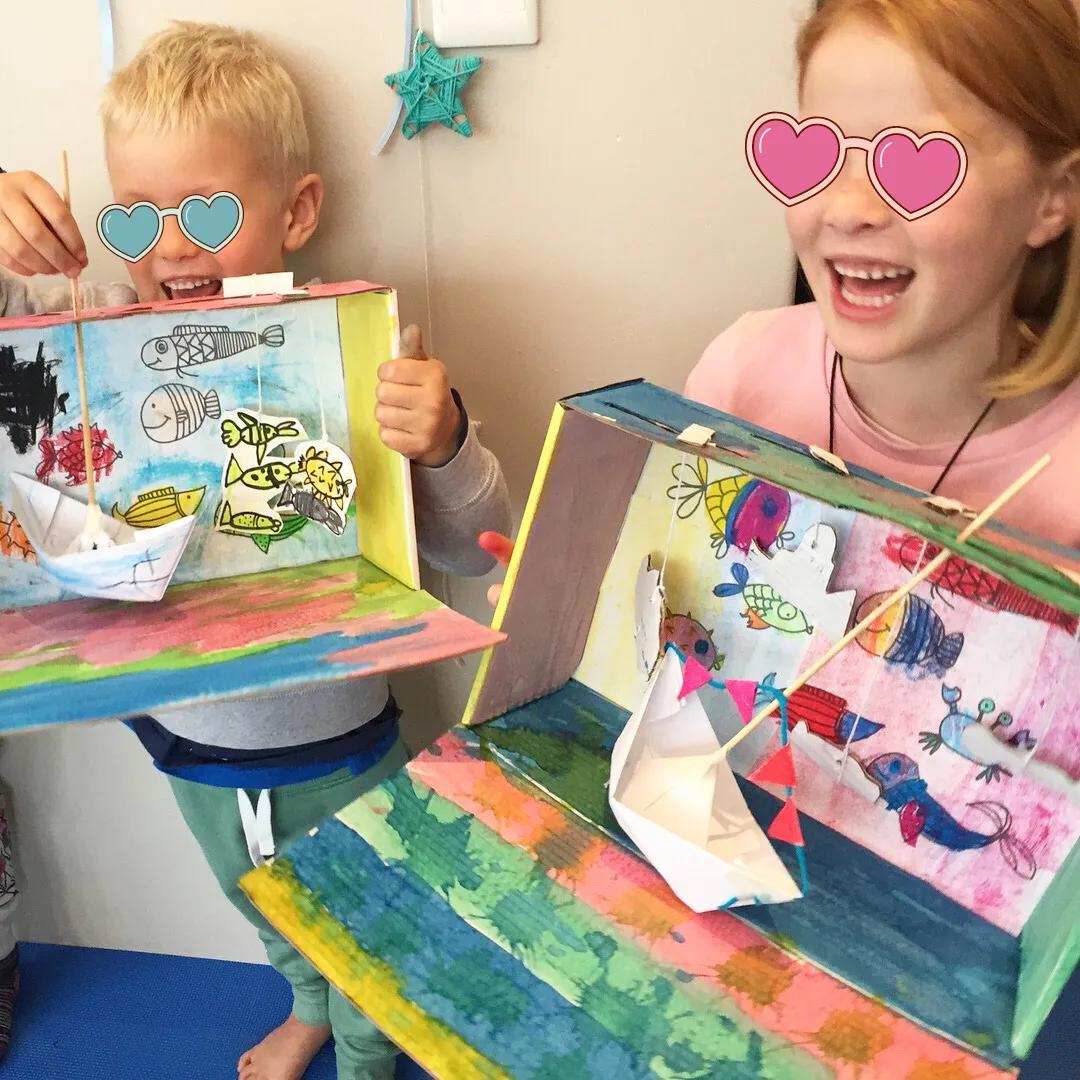
Your child will join an intimate group of no more than 10 friends and create something new each week, from frame-worthy art to fun toys to play with at home after class.
We look forward to having your child join our creative family!
Introducing:
(YourTown’s) Leading Monthly Subscription Kit for Ages (Age-Age).
So you can relax, knowing your child is getting the chance to explore their creativity and develop essential skills for the future!
We can't wait for your child to open up their first kit and see what's inside!
Introducing:
Clubname’s Weekly Online Classes for Ages Age-Age.
So you can relax, knowing your child is exploring their creativity, learning new things, and developing essential skills for the future! We’re so excited for your child to join our online classes!
Introducing:
(YourTown’s) Leading Arts & Crafts Club for Ages (Age-Age).
So you can relax, knowing your child is being creative, making new friends, and developing must-have skills for the future!
Whether you’re joining an in-person class, booking a birthday party or event, or exploring our DIY kits, we’re so excited for your child to join our club!
Introducing:
(YourTown’s) Leading Arts & Crafts Club for Adults.
So you can relax, be creative, make new friends, and develop hands-on skills.
Whether you’re joining an in-person class, booking a birthday party or event, or exploring our DIY kits, we’re so excited for you to join our club!
Hey there, we’re Christelle & Stefanie

As an architect and engineer, we believe that to ‘future proof’ our children in this fast-moving world, we need to equip them with problem solving and critical thinking skills.
This will prepare them for opportunities and careers that don’t even exist yet. Allowing them to thrive as
free thinkers and innovators.
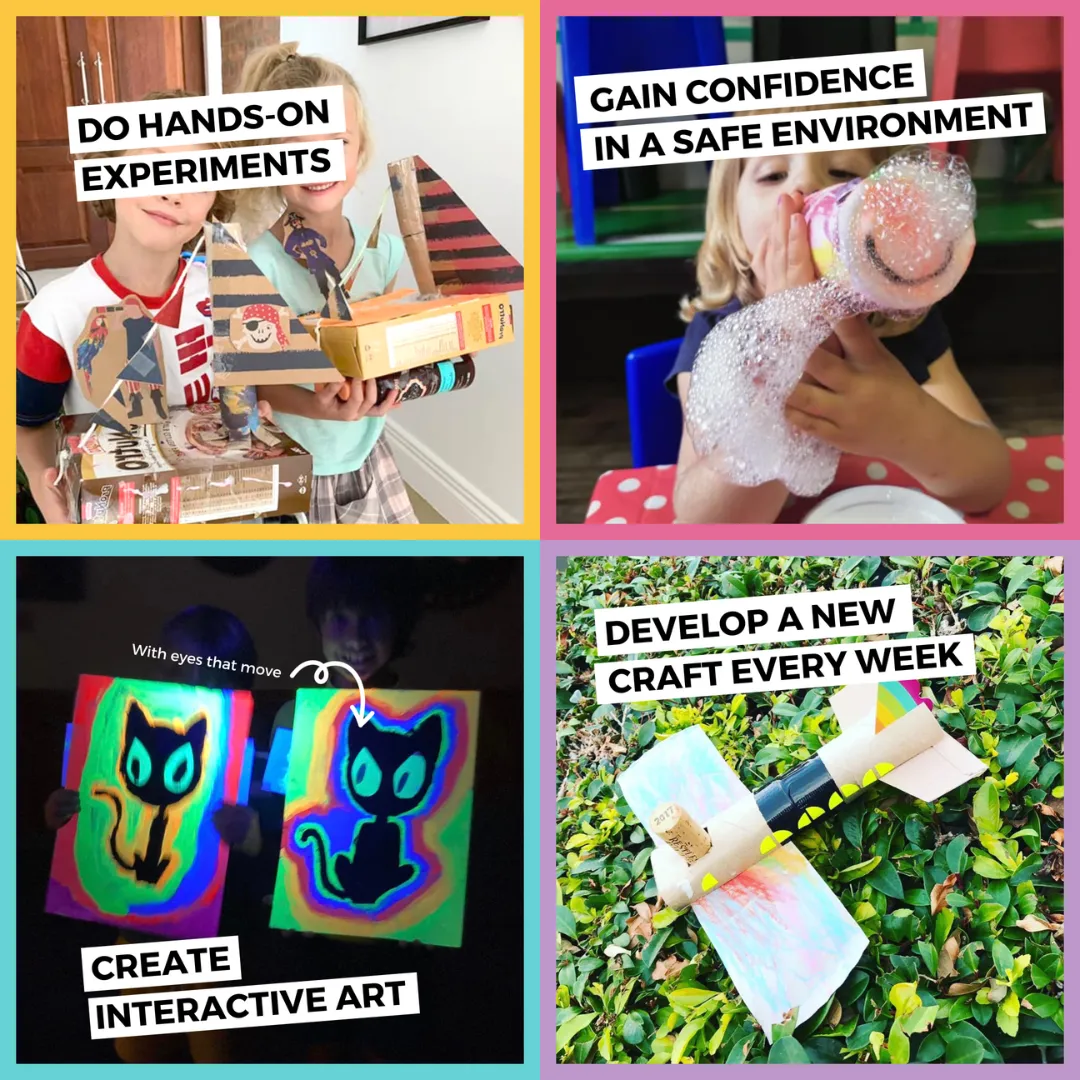
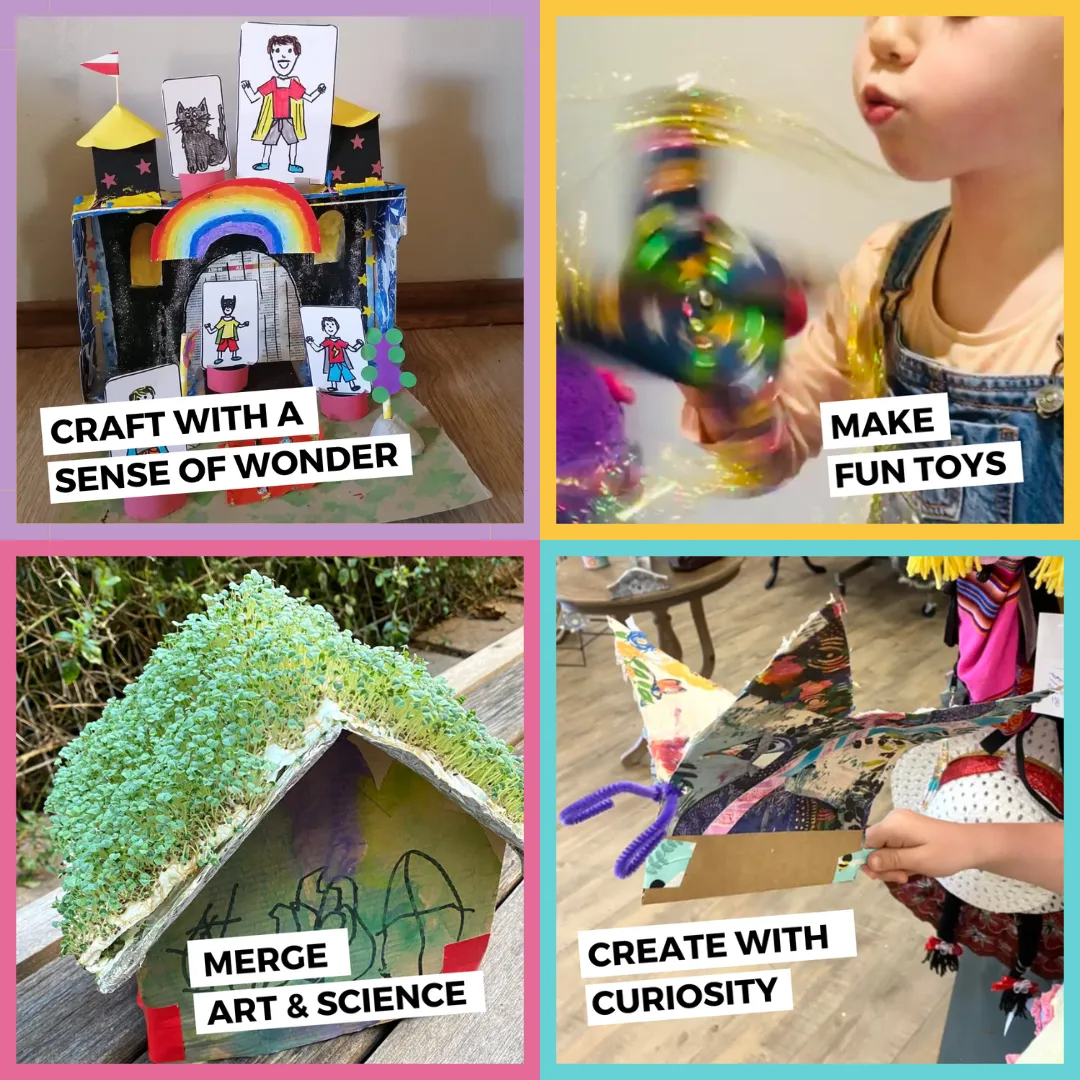
These super skills are developed in a Canvas Club class. Kids get to develop STEAM (Science, Technology, Engineering, Art, Mathematics) skills, be curious, create, build, think, learn and play!
So, if you’re ready to help your child be more creative and learn important skills in the process…
You've come to the right place!
Your Child Will Thrive By:
Being taught by an experienced and loving arts & crafts teacher!
Gaining confidence in being creative in a safe environment!
Learning important super skills for the future!
Learning to think in new and creative ways and developing a new craft every week that makes them feel proud!
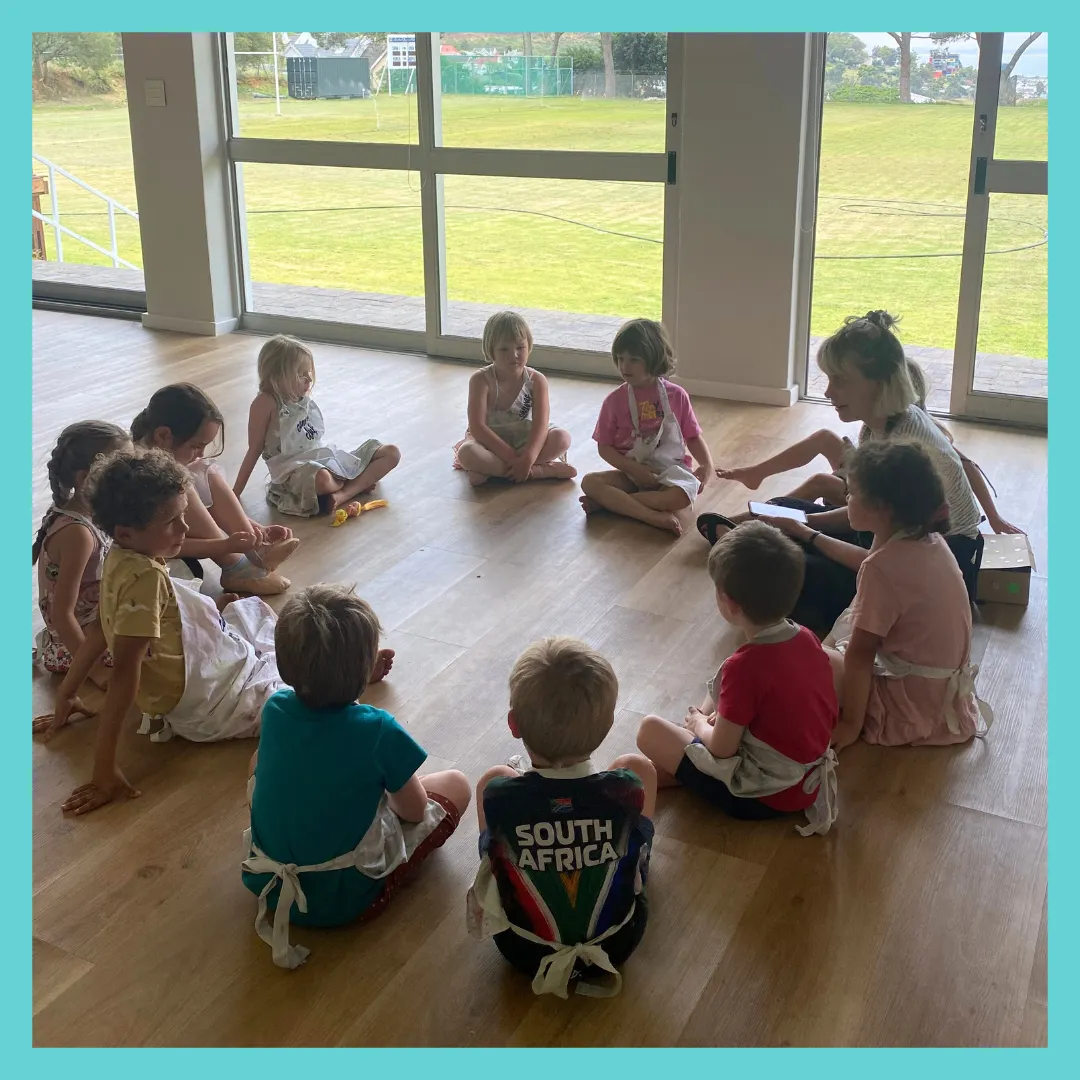
Being in a small class with a maximum of 10 friends. They'll get lots of special attention and never feel left out!
Your Child Will Love Everything About Our Craft Club! They Will:
Get excited to go to craft class every week!
Have fun and stay engaged while learning new skills!
Gain confidence by creating a new artwork or craft every week!
Your Child Will Thrive By:
Exploring their creativity with our carefully curated kits
Gaining confidence in their creative abilities in a comfortable home environment
Learning important skills for the future through hands-on activities
Developing new and creative ways of thinking with new projects every month
Your Child Will Love Everything About Our Creative Kits! They Will:
Look forward to receiving a new kit and exploring it every month!
Have fun and stay engaged while learning new skills!
Gain confidence by creating something new and exciting!
Your Child Will Thrive By:
Exploring their creativity with our carefully curated online classes
Gaining confidence in their creative abilities in a safe home environment
Learning important skills for the future through hands-on activities
Developing new and creative ways of thinking with a new lesson every week
Your Child Will Love Everything About Our Online Classes! They Will:
Look forward to a new lesson every week!
Have fun and stay engaged while learning new skills!
Gain confidence by improving their creative abilities!
Your Child Will Thrive By:
Being taught by a passionate and loving arts & crafts teacher!
Gaining confidence in being creative in a safe environment!
Learning important super-skills for the future!
Being in a small class with a maximum of 10 friends
Getting lots of special attention and never feel left out!
Your Child Will Love Everything About Our Craft Club! They Will:
Boost their creativity and learn to think in new creative ways!
Have fun and stay engaged while learning new skills!
Gain confidence by creating a new artwork or craft every week that makes them feel proud!
What We Offer
Our curriculum includes science, technology, engineering, art, and math (STEAM) to make learning fun. Kids love it!
We use the Creative Crafting Curriculum.
This curriculum has been developed by a team of experts including an architect, engineer, occupational therapist, and play therapist. It has been tested and proven successful in over 5,000 clubs. So, there's no need to look for other arts and crafts programs.
You can rest easy at night knowing that your child is receiving the best creative activities that will prepare them for the future.
We understand that time and money are valuable resources, that's why our lessons combine elements from five different clubs: crafting, art, music, clay work, and STEAM-based learning (which includes science, technology, engineering, art, and math).
In our club, your child will develop all of the skills below in an engaging, hands-on way!
Fine Motor Skills
Problem-solving Skills
Innovation
Self-expression
Social Skills
Self-esteem
Time Management and Planning Skills
STEAM (Science, Technology, Engineering, Art, and Math) Skills
Check out everything we do in each class!
Think & Brainstorm
We think outside the box, explore creativity, and practice our problem-solving skills
Craft
We practice our fine motor and time management skills
Play
We practice our gross motor and social skills while having fun!
We practice our gross motor and social skills whilst having FUN
Wind Down
We reflect on what we’ve learned
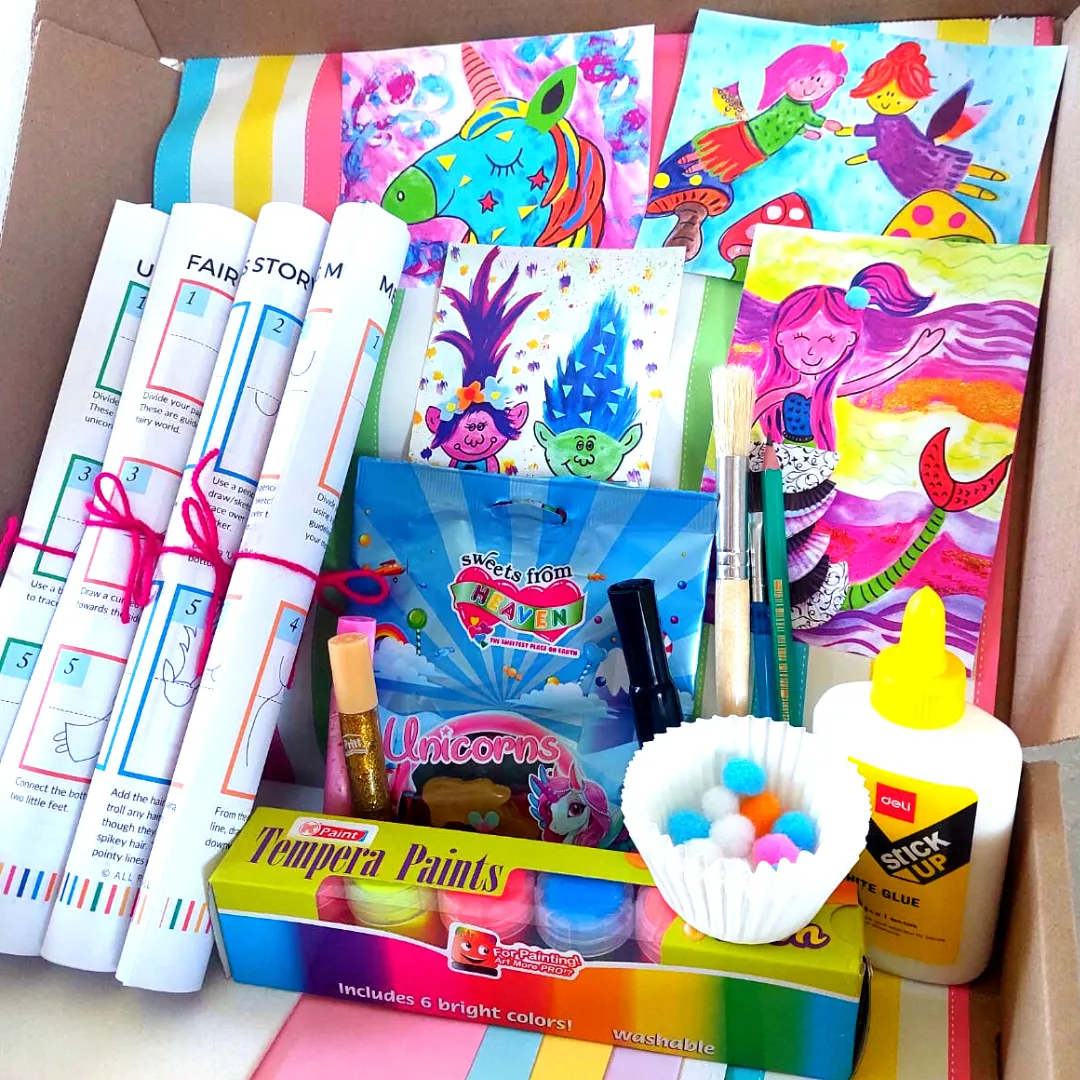
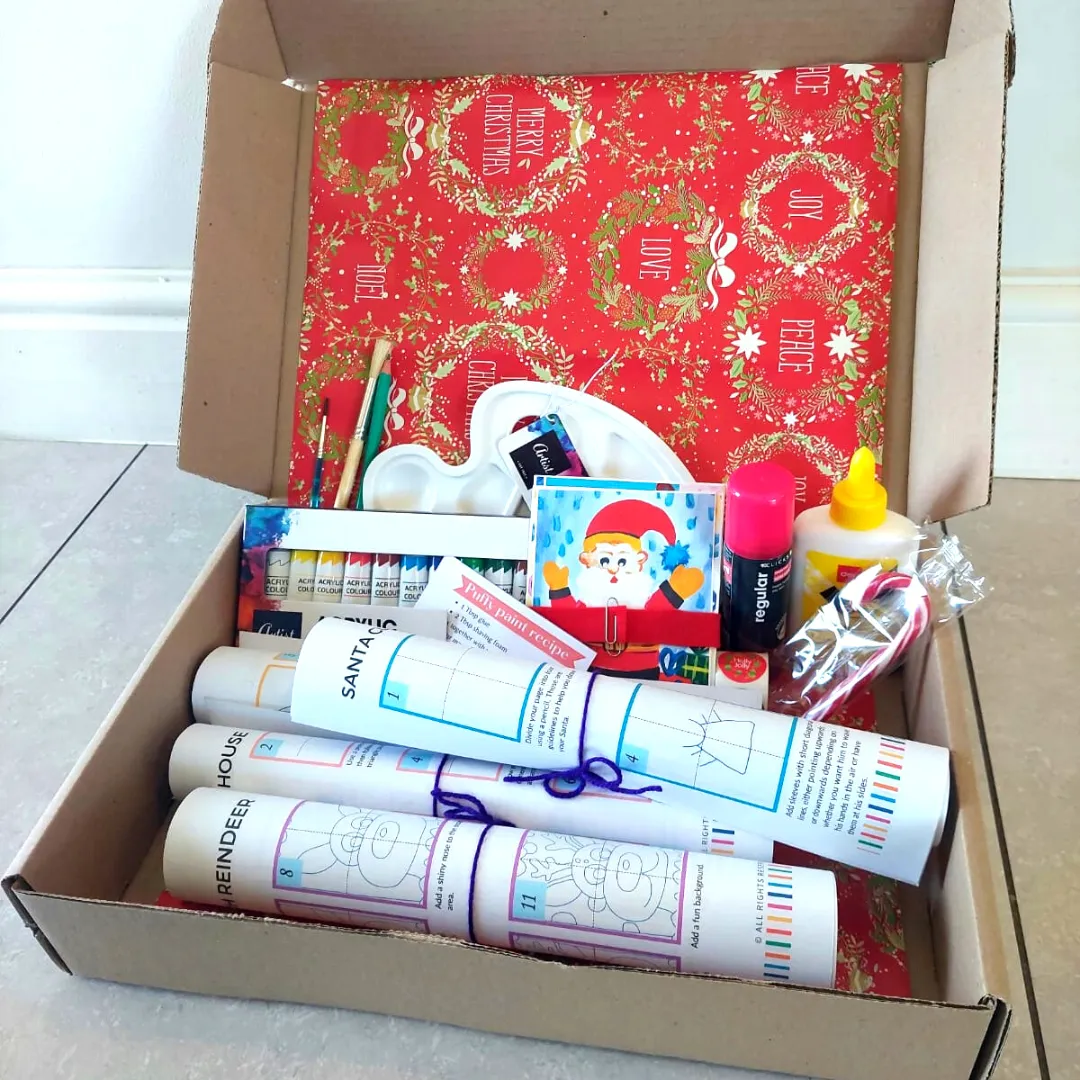
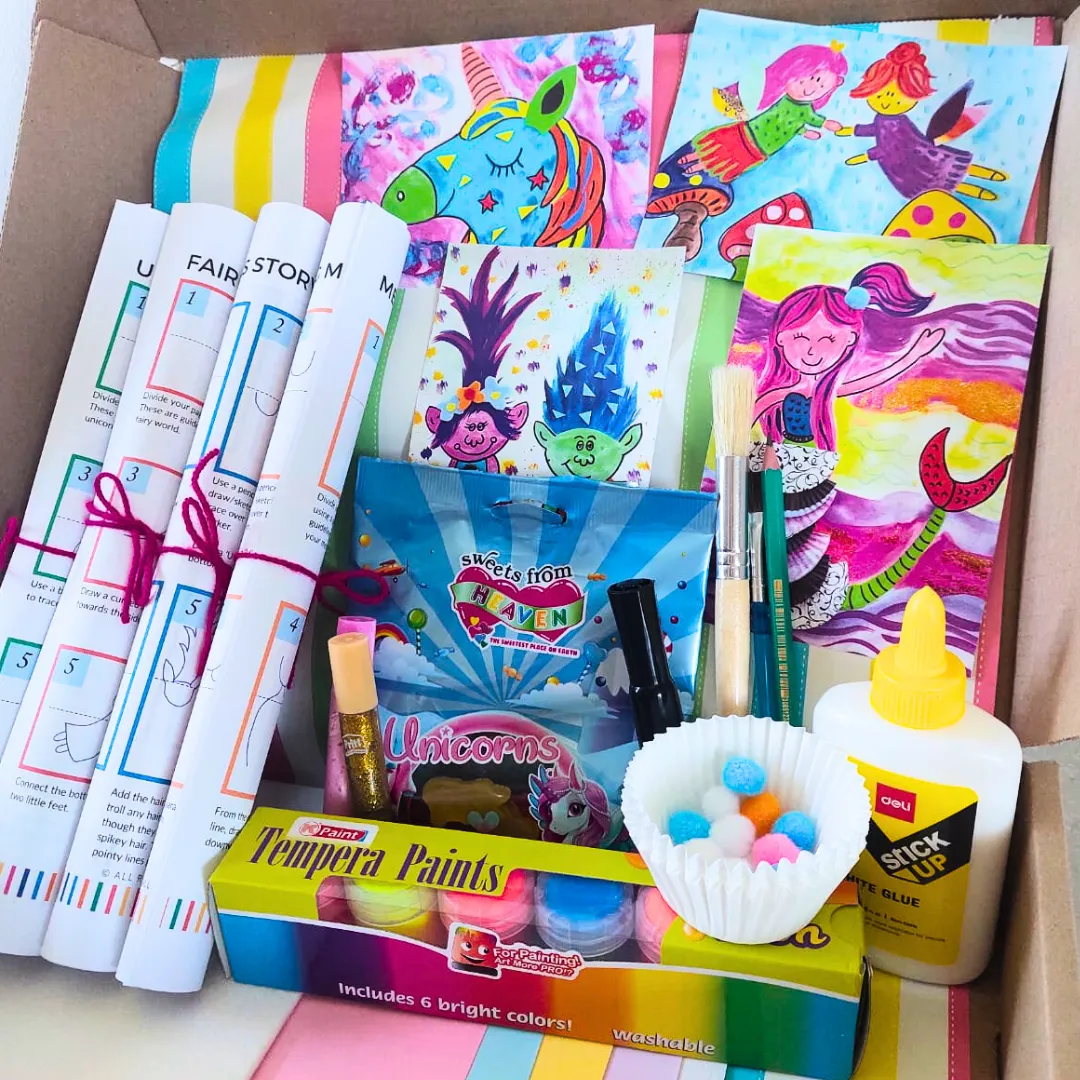
What's included in each kit:
🎨 A fresh batch of carefully curated projects to keep your child entertained throughout the month
🎨 Easy to follow, step-by-step instruction printouts
🎨 All the supplies you need to complete each project (no need to go shopping for supplies!)
🎨 A fun surprise!
Ages 0-0 | $00 per month
Our Art Curriculum Is Fun and Educational. Kids Love It!
We use the Creative Crafting Curriculum.
This curriculum has been developed by a fine artist and arts & crafts teacher. It has been tested and proven successful in over 5,000 clubs. So, there's no need to look for other arts and crafts programs.
You can rest easy at night knowing that your child is receiving the best creative activities that will prepare them for the future.
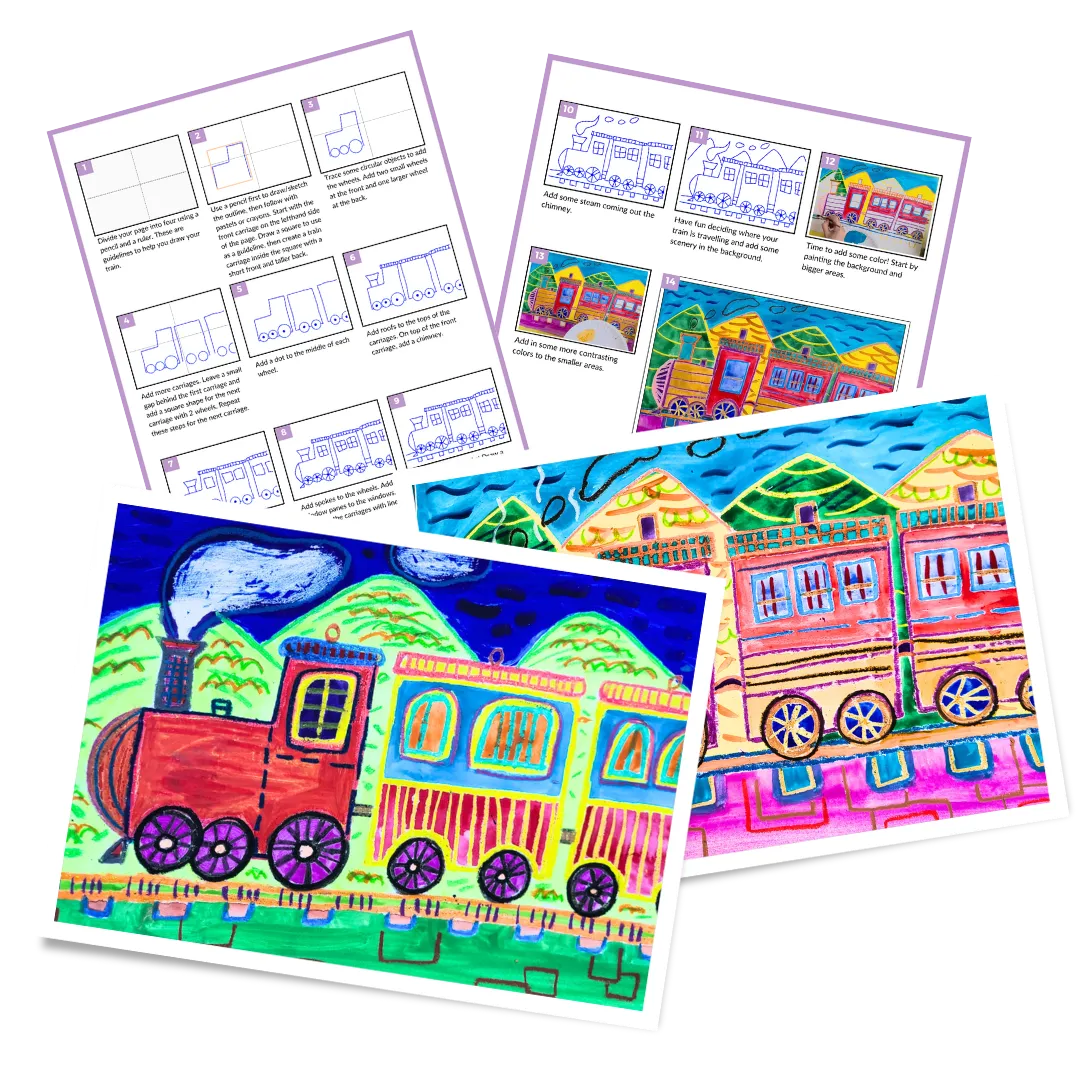
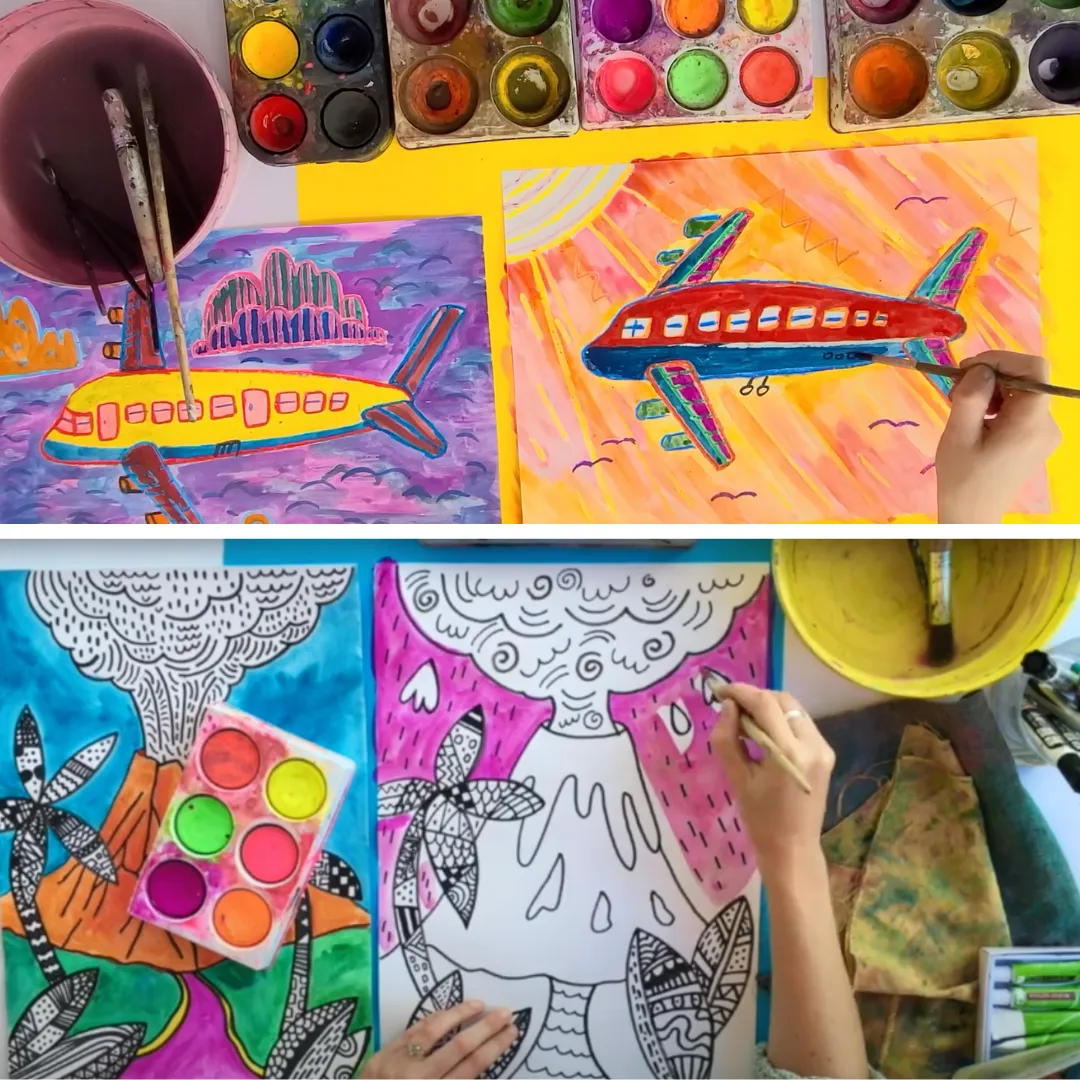
Topical projects that excite kids
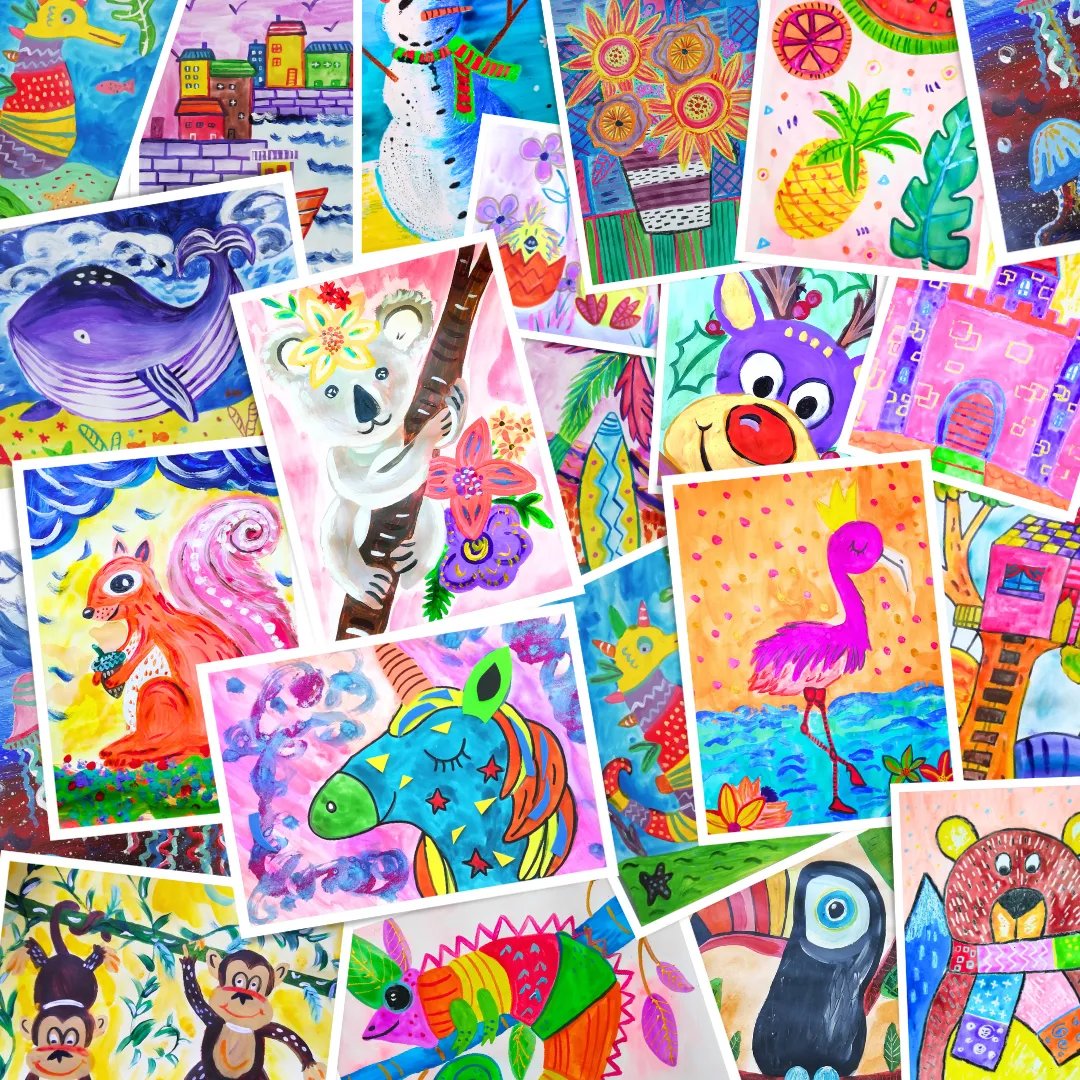
Easy to follow, step-by-step instructions
What we offer:
Weekly In-person Classes for Kids
Enroll your child in our weekly in-person arts and crafts classes at [insert name of venue], where they'll explore their creativity in a safe and nurturing environment. Your child will join an intimate group of no more than 10 friends and create something new each week, from frame-worthy art to fun toys to play with at home after class.
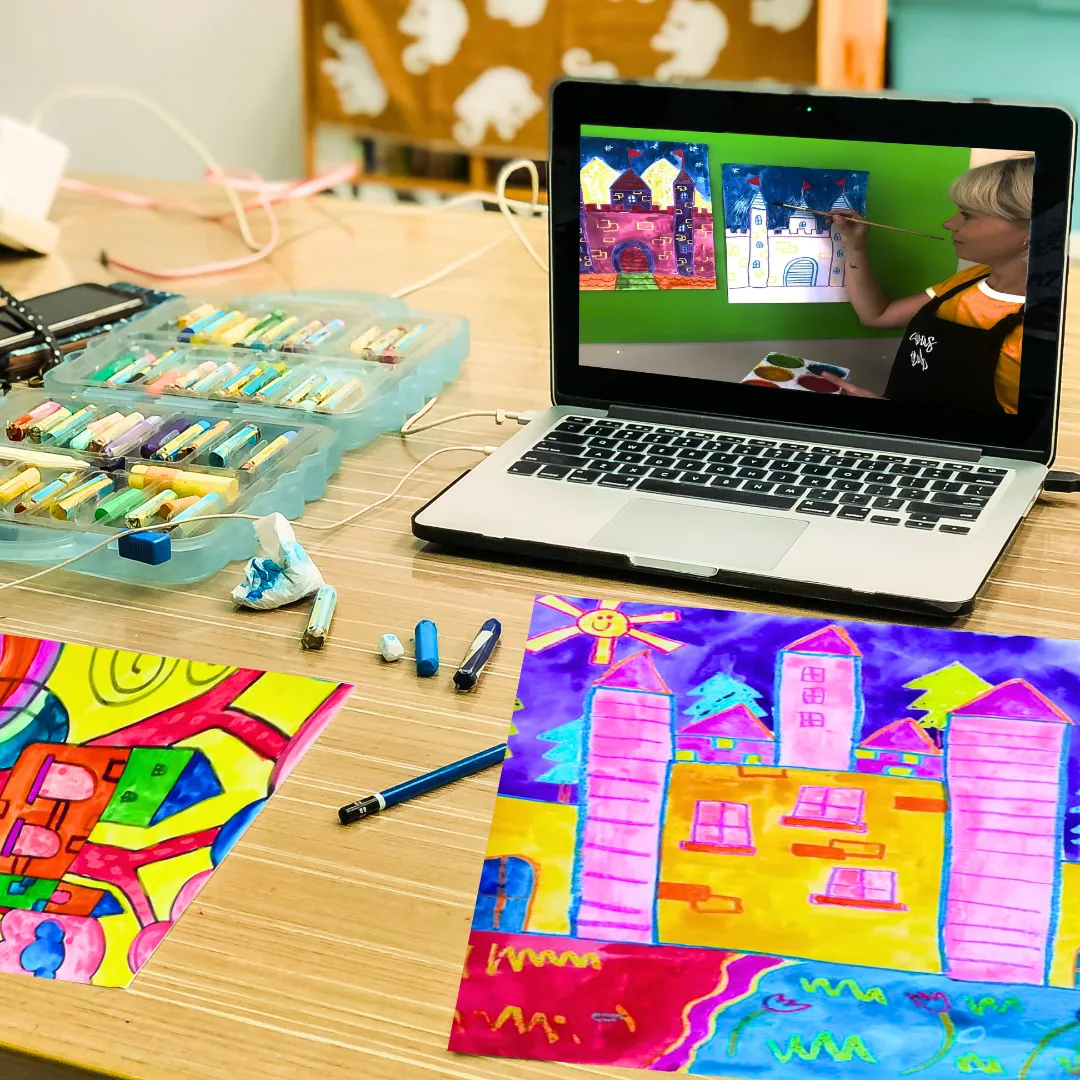
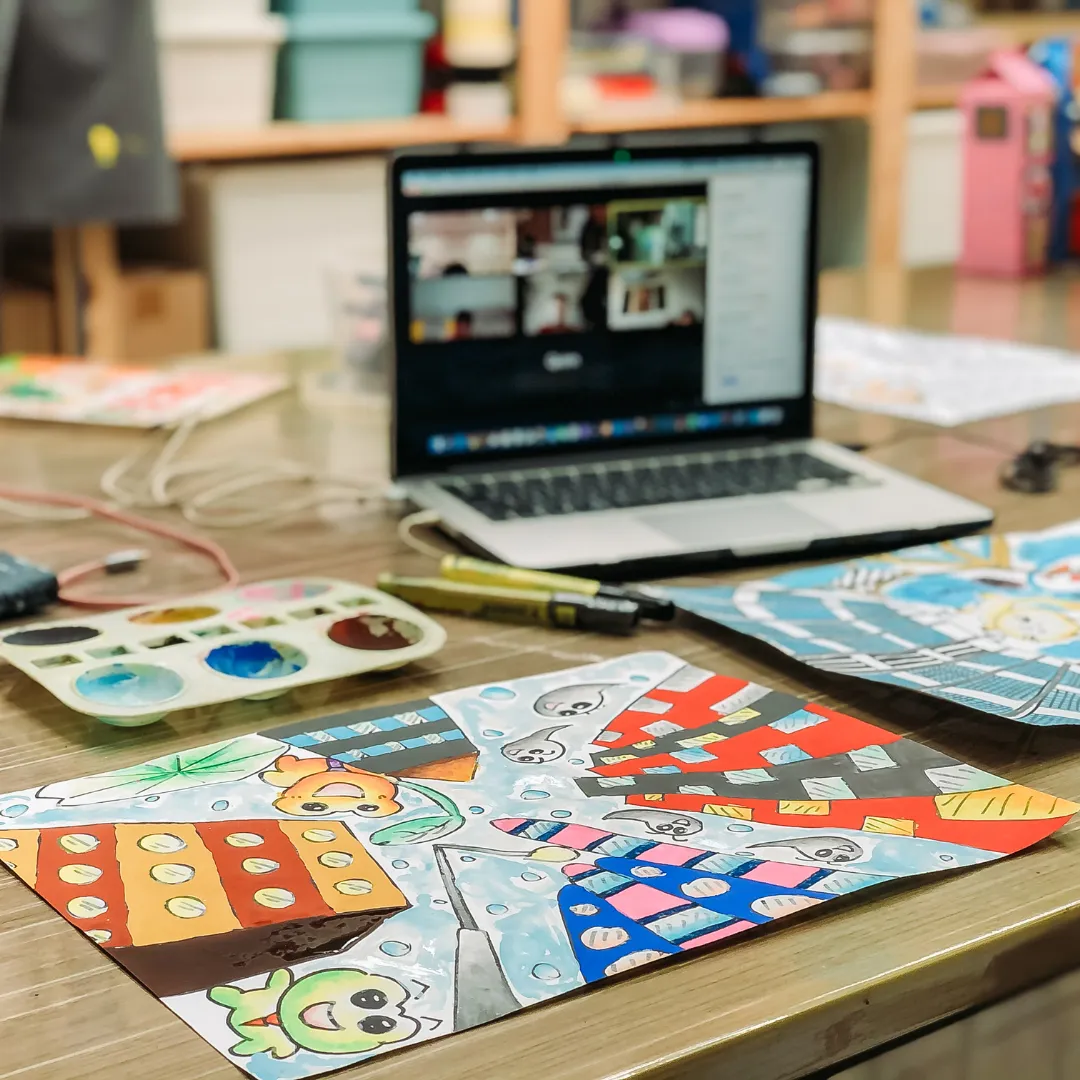
Weekly Online Classes for Kids
Enroll your child in our weekly online arts and crafts classes, where they'll explore their creativity from the comfort of your home. Your child will join an intimate group of no more than 10 friends and create something new each week, from frame-worthy art to fun toys to play with after class.
Weekly In-person Classes for All Ages
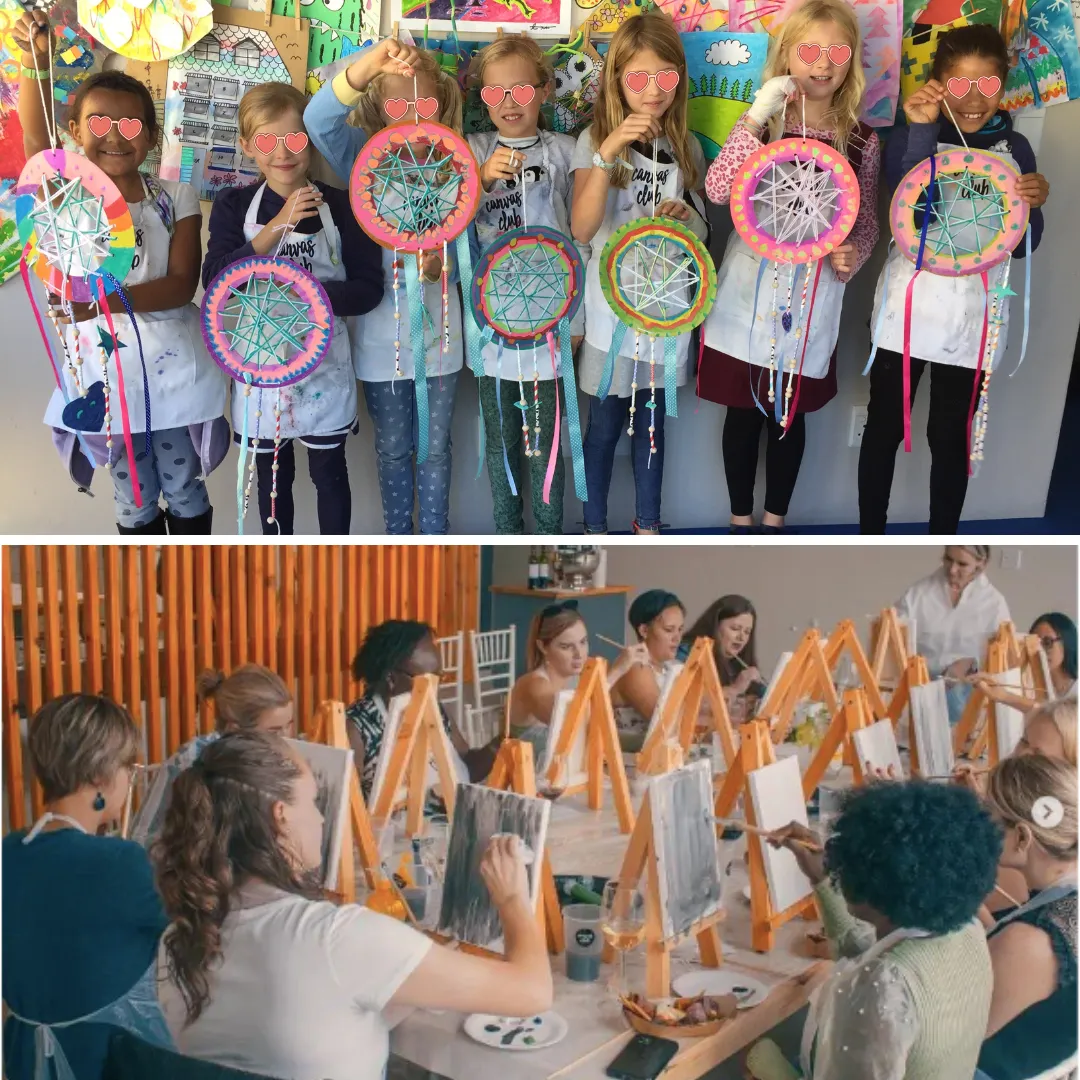
We offer classes for both children and adults, where you can explore your creativity in a safe and nurturing environment. You'll be a part of a small group of no more than 10 people and create something new every week, from beautiful art to fun crafts. Come and join us for a great time!
We practice our gross motor and social skills whilst having FUN
Weekly Online Classes for All Ages
Join us for our weekly online arts and crafts classes. We offer classes for both children and adults, where you can explore your creativity from the comfort of your home. You'll be a part of a small group of no more than 10 people and create something new every week, from beautiful art to fun crafts. Come and join us for a great time!
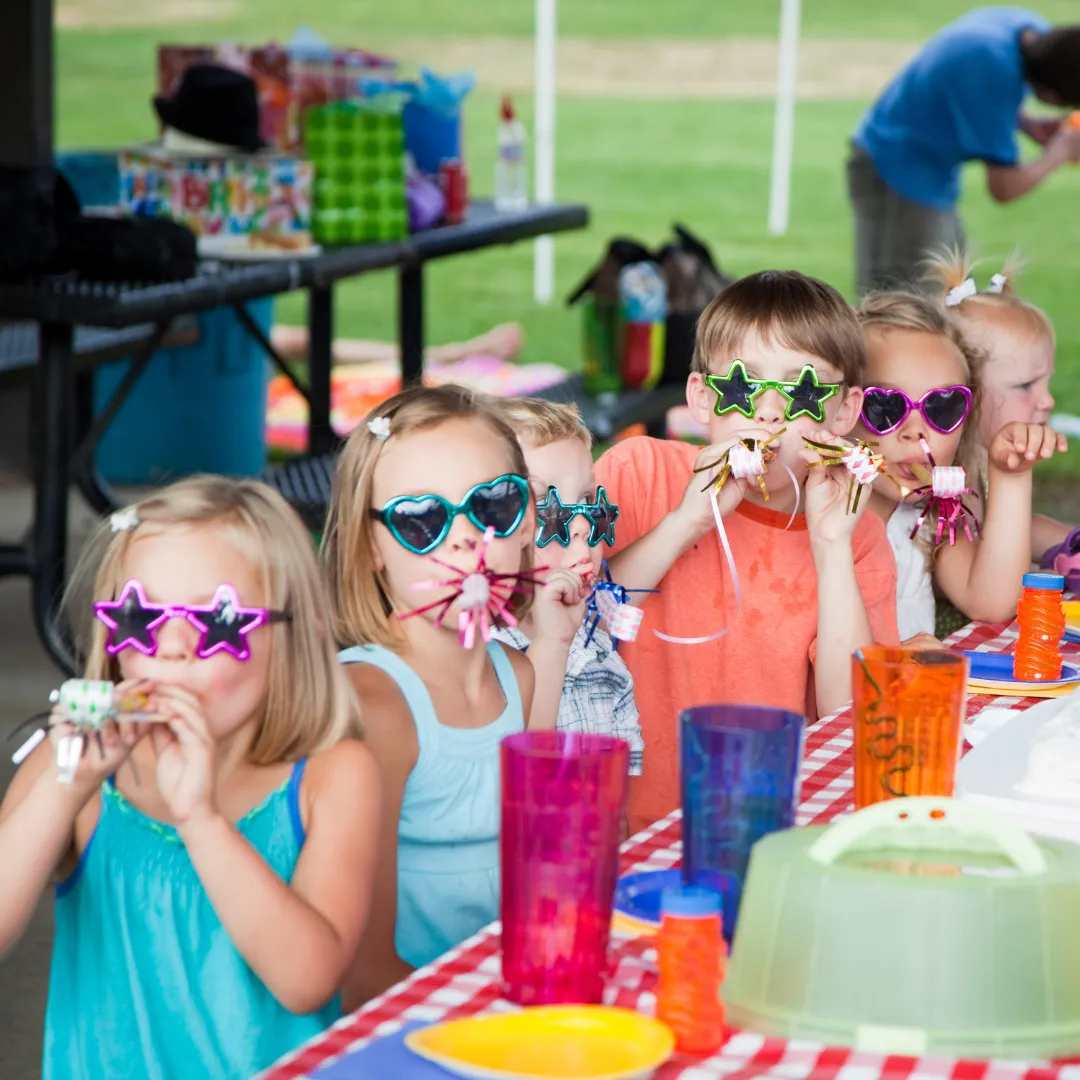
Arty Birthday Parties
Make your child's birthday unforgettable with our arty birthday parties. Pick a theme, and let us handle the planning and activities, ensuring a celebration filled with creativity, joy, and wonderful memories. Book your child's dream birthday party now!
We practice our gross motor and social skills whilst having FUN
Monthly Kits for Kids
Embark on a creative adventure every month with our subscription-based kits for kids. Our carefully curated kits include everything you need for a delightful crafting experience. Subscribe now and bring creativity to your doorstep!
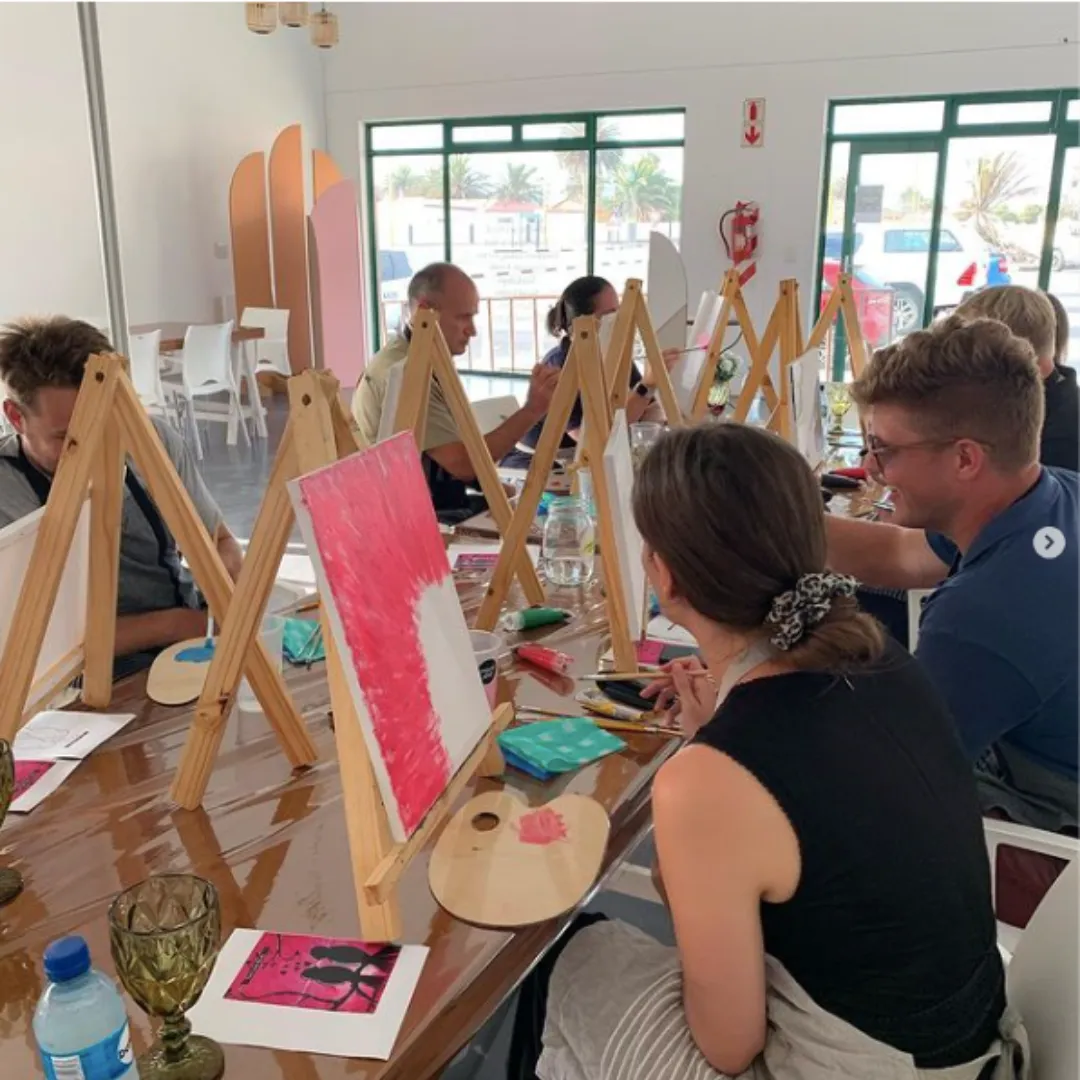
Weekly In-person Classes for Adults
Join us for our weekly arts and crafts classes, where you can explore your creativity in a supportive and fun environment. You'll be a part of a small group of no more than 10 people and create something new every week, from beautiful art to fun crafts. Come and join us for a great time!
Weekly Online Classes for Adults
Join us for our weekly online arts and crafts classes, where you can explore your creativity from the comfort of your home. You'll be a part of a small group of no more than 10 people and create something new every week, from beautiful art to fun crafts. Come and join us for a great time!
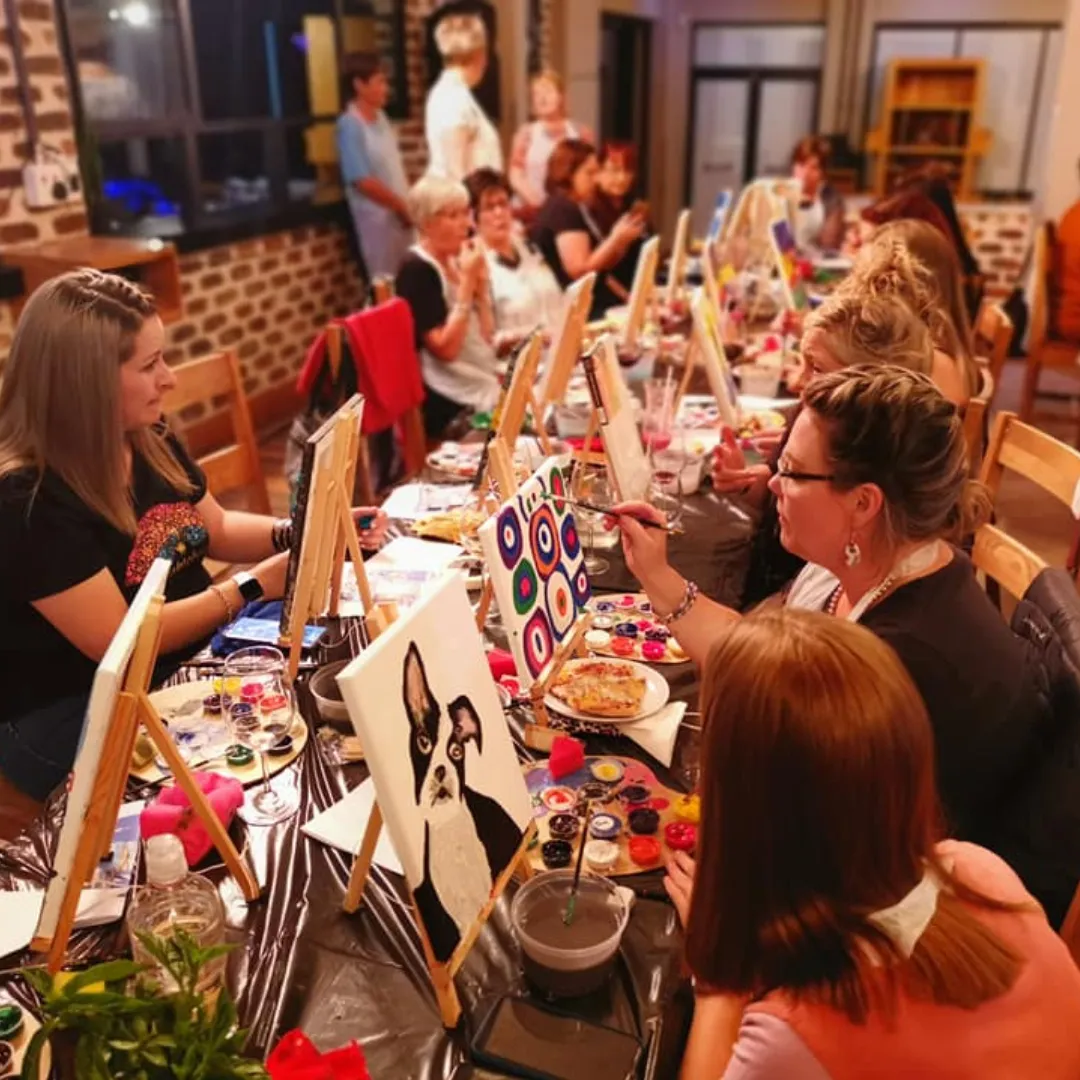
Bespoke Events
Looking for a creative and fun event for a group of kids or adults, or your family? Look no further than our bespoke events! We offer a range of options, whether you're planning a memorable party, a team-building extravaganza, a delightful baby shower, or just a fun night of painting and sipping with friends. Our bespoke events are designed to inspire and bring people together in the name of creativity, regardless of skill level. Contact us to plan your next unforgettable event!
We practice our gross motor and social skills whilst having FUN
Monthly Kits for Adults
Embark on a creative adventure every month with our subscription-based creative kits for adults. Our carefully curated kits include everything you need for a delightful crafting experience. Subscribe now and bring creativity to your doorstep!

But don’t just take our word for it…
See what others are saying about us!
The fact that the curriculum was developed by an architect, engineer, occupational therapist, and artist is just amazing.
The benefits of the lessons to a child's developmental skills blow my mind!
The fact that the curriculum was developed by an architect, engineer, occupational therapist, and artist is just amazing.
The benefits of the lessons to a child's developmental skills blow my mind!

Claudi, Mom
What a wonderful activity for my four-year-old son to partake in! It really sparks his creativity.
The Occupational Therapy reasoning (provided to parents about the activity post-class) allows you to understand the super-skills practiced through each creative class.
Sarah, Mom
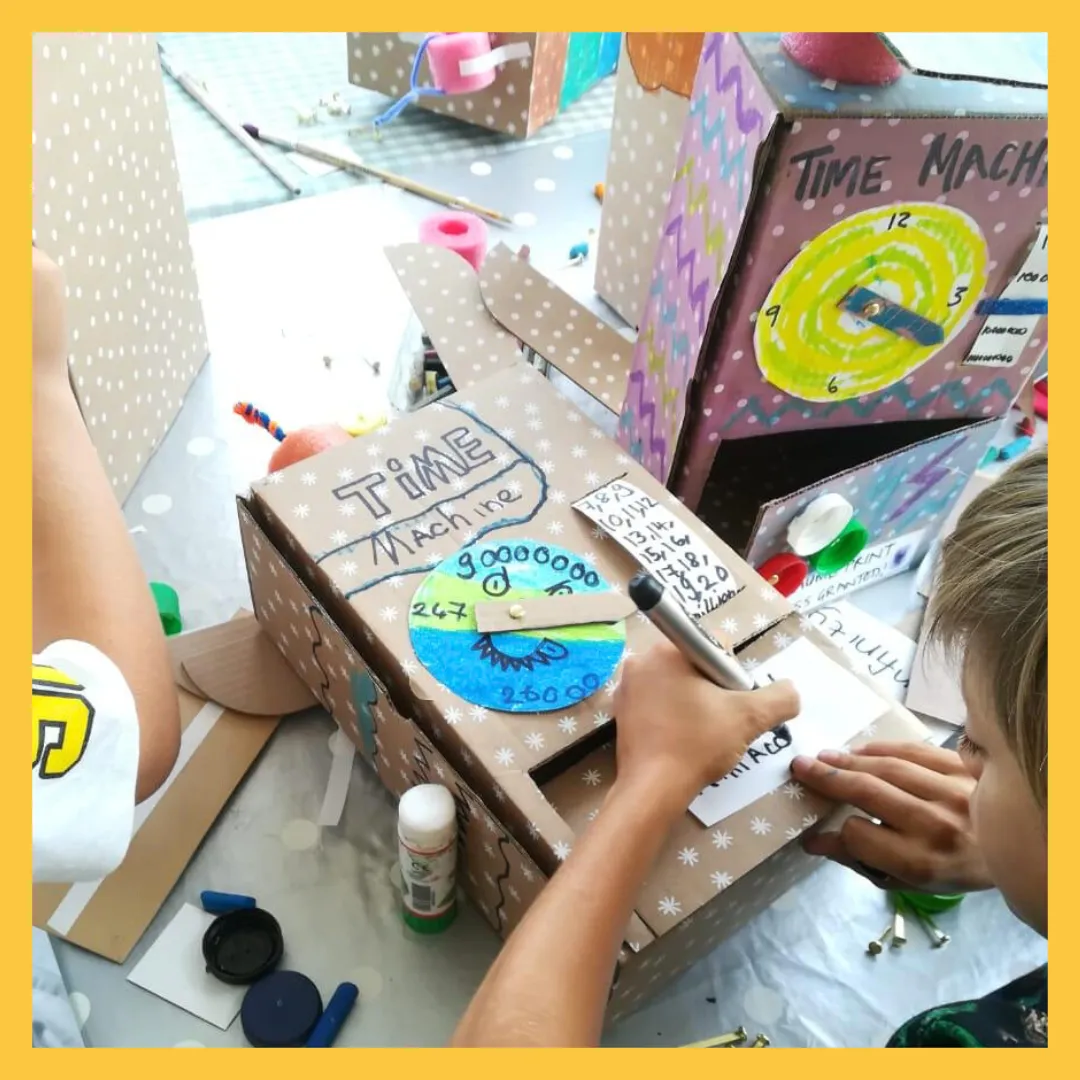
We make cool crafts that can DO STUFF. Like rockets that can shoot and cars that drive!
Sometimes we work with cardboard, and other times with paint or clay, and that's why I love this club.
Lucas, Student (9)
The fact that the curriculum was developed by an architect, engineer, occupational therapist, and artist is just amazing.
The benefits of the lessons to a child's developmental skills blow my mind!
"So much thought, planning, and PASSION goes into these kits!
I love that there are so many activities in one box."
Michelle, Mom
"The superior quality of the materials is what sets these kits apart.
I highly recommend these to anyone looking for activities to do at home."
Mary, Mom
"My son LOVES these kits.
He gets totally absorbed!"
Murray, Dad
The fact that the curriculum was developed by an architect, engineer, occupational therapist, and artist is just amazing.
The benefits of the lessons to a child's developmental skills blow my mind!
"So much thought, planning, and PASSION goes into these classes!"
Claudi, Mom
"The projects are fantastic. I am always blown away by the level of creativity that goes into each lesson."
Sarah, Mom
"My son LOVES these classes.
He gets totally absorbed!"
Murray, Dad
The fact that the curriculum was developed by an architect, engineer, occupational therapist, and artist is just amazing.
The benefits of the lessons to a child's developmental skills blow my mind!
The fact that the curriculum was developed by an architect, engineer, occupational therapist, and artist is just amazing.
The benefits of the lessons to a child's developmental skills blow my mind!
Claudi, Mom
What a wonderful activity for my 4-year-old son to partake in. It really sparks his creativity.
The Occupational Therapy reasoning (provided to parents about the activity post class) allows you to understand the super-skills being practiced through each creative class.
Sarah, Mom
We make cool crafts that can DO STUFF. Like rockets that can shoot and cars that drive.
Sometimes we work with cardboard, and other times with paint or with clay, and that's why I love this club.
Lucas, Student (9)
"I love the energy in these classes. I’m so happy to find a group of people who are just like me!"
Joy
"I booked a paint n sip party for my 50th. It was such a hit with the girls - even the ones who said they’re too nervous to paint had such a great time!"
Gabriela
"These projects are so imaginative and well designed, I could never think of something like this myself. I love how easy it is to make something beautiful!"
Jane
Stock is limited. Order your kit today!
Due to high demand, our spots fill up very quickly. Register soon to ensure you don’t miss out!
Due to high demand, our spots fill up very quickly. Register soon to ensure you don’t miss out!
Have questions? Let us answer them for you...
Do I have to buy the supplies?
No. The supplies are included with the cost of registration.
How big are the classes?
We feel it is important that everyone receives special attention; therefore, all classes are typically kept to a maximum of 10 students.
What do I bring to class?
We provide all the supplies and materials. All you need to do is bring a good attitude and an open mind.
What do I wear?
The classes tend to get messy and could result in paint or other damage to personal items or clothing. Therefore, students are strongly encouraged to wear old clothes. We are not responsible for any damages.
What if a class is canceled?
In the rare case that a class may be canceled, you will be notified as soon as possible, and your class will be rescheduled.
How do I sign up?
Click on the "Contact" button and reach out to us.
Do I need additional supplies?
Depending on the project, you may need a stapler or a pair of scissors. The rest is included!
How often will I receive a new kit?
You will receive a new creative kit every month as part of your subscription.
Can I customize the content of each kit based on my child's interests?
Currently, we do not offer customization options. However, our kits are thoughtfully curated to provide a diverse and engaging creative experience.
Are the instructions easy for children to follow on their own?
Yes, the step-by-step instructions are designed to be kid-friendly, allowing children to explore their creativity independently. Younger children may require some adult assistance.
How long does it take to complete a project from a typical kit?
The time it takes to complete a project varies, but most activities are designed to be completed within 45 minutes to 1 hour. Some projects may be more involved and can be spread out over multiple sessions.
Are the materials environmentally friendly?
We are committed to sustainability. While not all materials are eco-friendly, we strive to minimize environmental impact by using recyclable and biodegradable materials whenever possible.
Can I purchase a single kit without subscribing?
At the moment, we only offer subscription plans. This allows us to provide you with an exciting creative experience every month. If you feel uncertain, you can sign up and receive your first kit, and if you’re not happy you can simply cancel your subscription by sending us an email.
Do you ship internationally?
Currently, we do not offer international shipping. We're working on expanding our reach, so stay tuned for updates!
How do I enroll my child in your weekly online classes?
To enroll your child, simply click on the "Enroll Now" button. Follow the easy steps to complete the registration process.
What age groups are your online classes suitable for?
We feel it is important that everyone receives special attention; therefore, all classes are typically kept to a maximum of 10 students.
How often will my child receive a new lesson with the weekly subscription?
Your child will receive a new and exciting lesson every week as part of the weekly subscription.
Can I customize the content of each class based on my child's interests?
Currently, we do not offer customization options. However, our classes are thoughtfully curated to provide a diverse and engaging creative experience for all participants.
Are the instructions easy for children to follow on their own?
Yes, the step-by-step instructions are designed to be kid-friendly, allowing children to explore their creativity independently. Younger children may require some adult assistance.
How long does it take to complete a project from a typical class?
Most activities are designed to be completed within 45 min - 1 hour. Some projects may be more involved and can be spread out over multiple sessions.
How do I know which supplies to buy for the online classes?
A supply list will be sent to you ahead of time. If you do not receive your supply checklist for whatever reason please contact us via email and we will send it to you.
What is the format of the online classes?
Our online classes are conducted virtually through a user-friendly platform.
Are your online classes available internationally?
Absolutely! Our online classes are accessible to children around the world. Join us from anywhere.
Can I cancel my subscription at any time?
Yes, you can cancel your subscription at any time. Simply log in to your account and manage your subscription preferences. Please note that cancellations made after the renewal date are not eligible for a refund.
Do I have to buy the supplies?
No. The supplies are included with the cost of registration.
How big are the classes?
We feel it is important that everyone receives special attention; therefore, all classes are typically kept to a maximum of 10 students.
What do I bring to class?
We provide all the supplies, materials, and an apron. All you need to do is bring a good attitude and an open mind.
What do I wear?
The classes tend to get messy and could result in paint or other damage to personal items or clothing. Therefore, students are strongly encouraged to wear old clothes. We provide an apron. We are not responsible for any damages.
What if a class is canceled?
In the rare case that a class may be canceled, you will be notified as soon as possible, and your class will be rescheduled.
How do I sign up?
Click on the "Contact" button and reach out to us.
Do I have to buy the supplies?
No. The supplies are included with the cost of registration.
What do I bring to class?
We provide all the supplies and materials. All you need to do is bring a good attitude and an open mind.
What do I wear?
The sessions tend to get messy and could result in paint or other damage to personal items or clothing. Therefore, students are strongly encouraged to wear old clothes. We are not responsible for any damages.
What if a class is canceled?
In the rare case that a class may be canceled, you will be notified as soon as possible, and your class will be rescheduled.
How do I sign up?
Click on the "Contact" button and reach out to us.